


How to make beer at home
The guide of Polsinelli Homebrewing School to produce beer at home with the all grain method, fementables, hop, yeast, equipment, mash, recipes
Let's learn with the course of
FIRST LEVEL
and improve the technique with the course of
SECOND LEVEL
Info corsi@polsinelli.it - 0776 869068 int. 214
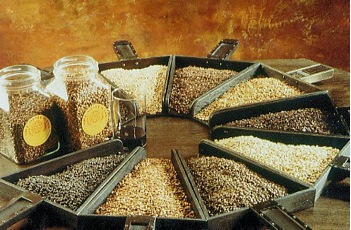
THE FERMENTABLES
Barley Malt is the principal ingredient which gives fermentables sugars to beer. Base Malts: Pale, Ale and Pilsener form between 80 and 100 per cent of the mash.
To make a beer (excluding some styles) is not only important to use base malt, it’s not completed..but it is necessary to use special malts which give to it all organoleptic characteristics it needs. When we talk about special malts there is a huge variety, some of these are: Crystal, Munich, Vienna, Chocolate and Black malt.
There are also others as Brown, Mild, Special “B”, Victory, Special roast, Rauch, peat-smoked…. In addition, you can try types of cereals insted of barley: wheat is so common that many classic styles cannot be made without using it. Then there are: corn, oats, rye… So on and so forth! Sooner or later, you will try all of them.
Thanks to these ingredients, the brewer can customize the beer as he wants. Most of styles (and all large commercial beer) have a specific list of grain that you need to learn in order to approximate the flavor of beer.
REMEMBER: take a grain of malt and chew! it will help us to taste the flavor of the malt and other details released to beer.
Base Malt
- Pilsner: is the base malt for most Continental European beers. It gives the light color to the beer.
- Pale: it is similar to Pilsner but with some differences: it has less protein, so less risk of turbidity in the beer and it is less clear but richer in enzymes.
- Vienna, Munich malts: give a darker color to beer, from amber to brown if used 100%. They are formed by enzymes used to convert themselves. Thanks to these malts we can make a full-bodied beer with flavor and color, elements derived from barley.
- Aromatic malt: It is a type of malt similar to Munich malt but darker than this one. It gives a higher aroma and the color is about 20 ° L.
- Amber malt: It was usually used by brewers to make The Porter; today, you can produce it: roasting Pale malt in the oven.
- Biscuit malt: it’s a roasted malt characterized by chromated gradation, up to 25°L lower than chocolate malt and brown malt. It gives a light burnt roasted taste, and a light brown colour. It does not contain enzymes
- Black/maltoroasted malt: it’s a barley malt, roasted at high temperatures. It can be present in smaller quantities in style of beer as Scotch Ale and in bigger quantities as Porter. It gives a dry flavor, a bitter taste, as ash’s flavor. It is used to give the color of the beer, because it brings few color to the foam’s beer. It does not contain enzymes.
- Brown malt: it is roasted malt but used rarely. It is less darker than chocolate malt and it is used for beers as: Bitter, London Porter, Mild and Sweet stout.
- Chocolate malt: it’s a barley brown malt; somebody says that its flavor is acrey and stronger, others say it’s flavor is similar to the flavor of roasted hazelnut. It is usually used for beers as: Porter,Stout, Brown Ale and Dunker. It does not contain enzymes.
- Crystal/Caramel/Carastan malt: these types of malt can be used for beer which as the same process of preparing. However, malthouses distinguish them by colors: CaraVienna and CaraMunich can be used to describe Crystal malt of different colors; CaraPilsè is the lightest malt. Crystal malts have an index of colour that can vary from 20°L to 120° L. They give flavor like hazelnut, biscuit and caramel. These malts characterized the taste and the density of the beer. Thanks to the variety of colors and flavors, they are used in beers as Lager and Ale. They do not contain enzymes.
- Destrinico/Carapils malt: This is a crystal malt, light colour (about 10°L), that give mostly density to the beer while it has minimal impact of colour and flavor; It can be used for light beers as Pilsner.
- Barley flakes: They can be added directly in mashing. It gives a flavor of wheat and they form beer’s foam and its retention. It is used for Pitter, but mostly used for beers as Mild and Stout.
- Mild malt: it can be used as base malt, especially for beers as Mild Ale. It gives a light taste of hazelnut
- Munich malt: It is usually defined as a malt characterized by sweet and light flavor. This type of malt has not crystal’s flavors. It’s color can vary from gold to amber red. In Vienna, Märzen, Oktorberfest recipes and some Bock can make up most of the grains; it can be used in small quantities to give flavor and other types of style.
- Peat malt: it is a smoked malt as the Rauch malt but in this case the smoke arrives from turf fire. It can be used in specific interpretation of scottish Ale.
- Rauch malt: it is a quite light malt then smoked on a wood fire. It gives the taste that characterized Rauchbier of Bamberga.
- Roasted barley: it is not a barley malt, it is roasted at high temperatures so that it can reach a dark colour, nearly black. It gives the flavor of roasted coffee and it is usually used for Stout’s style. At the same time it can give a dry and bitter taste. If it is used as dye, in large quantities, produces a really dark beer and brown foam.
- Special Roast malt: defined by malthouses “malted twice”: it gives an orange colour and a toasted taste. It can be used as a flavoring malt in some styles because it helps filtering and providing to create a full-bodied beer.
- Vienna malt: Its process of preparing is the same of Munich malt. It has light color, from the gold to the orange.
ADDITIONAL GRAINS
- Maltowheat / Wheat malt: gives a lighter color to the finished product, perhaps due to the lack of shell. This lack can create problems in mashing and filtration, where the flow can become slow or stop. Wheat malt represents for the majority of grains in German wheat beers, which include BerlinerWeisse, Bavarian Weizen, dunkel weizen and weizenbock as it increases head and retention. Unmalted wheat is an important component in the Belgian white “wit” style and is traditionally used in lambics.
- Oats: contributes to creaminess and oiliness, the quantity of the oil and fat cause problems, whatever the quantity used, and makes the imitation process almost impossible. Often used in Belgian whites wit, Oatmeal Stout.
- Rye: it is found malty, flaked and roasted. Light color, helping to create a creamy foam and the oiliness that can become even extreme if used in large quantities. When used in quantity, it gives dryness, and has an aroma and taste reminiscent of ripe apples, calvados or apple brandy.
- Maize: gives a sweet, cereal taste to beers, especially those with a delicate flavor profile, contributes mainly to increasing alcohol production. This cereal is degerminated before use to eliminate the oily part. Flakes do not need to be boiled before being added to the mash. It is sometimes used in English Pale Ale and Bitters and in some American Lagers.
Special fermentables
If fermentable material other than malt is added, consider how to use it and what it will bring to the finished product. Many special ingredients such as fruit, honey and molasses can be used.
Sugars and Syrups
Yeast ferments sugar to produce alcohol and C02; for this reason it could seem that each type of sugar could be a suitable addition to the beer. However, sugar has not only a unique chemical element, but it has lots of chemical elements. Furthermore, each type of sugar, of common origin, includes not only sugar, but also shares of non-fermentable compounds.
- Honey: It is a highly concentrated type of natural sugar and it includes impurities that can give the beer a particular taste and aroma. Thanks to its flavor, honey can be used in every proportion as fermentable.
- Crude sugar: It has the 97% of sucrose, so it should be highly fermentable and contain few impurities that provide flavor. If you want to taste it, it is better to buy the cane one.
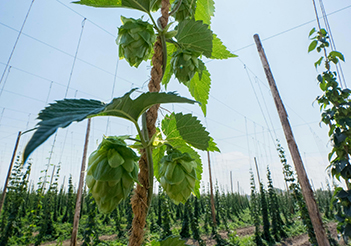
THE HOP
Hops are the green inflorescences of a creeper known as Humulus lupulus. The plants grow on wire trusses that reach 6 meters in height. In August and September, when it is collected, the shoots are cut and taken to the producer's treatment plant.
Machines pick the hop cones from the shoots and separate them from leaves and other waste before sending them to huge drying chambers. There, hot air is passed through the hops up to 24 hours to remove most of the moisture. Subsequently, the dried hops are packed and sent to wholesalers for distribution. The alpha acids present in soft hop resins are of great importance to brewers, as they provide most of the bittering properties.
During wort boiling, these alpha acids undergo a structural change known as isomerization, which creates the bitter compounds found in finished beers. These bitter compounds are generally known as “iso - alpha acids”. Even Beta-acids can suffer isomerization during boiling and form bitter compounds, but they give less bitterness because they are poorly soluble in the must.
Alpha-acids deteriorate during conservation and for this reason the hop must be under vacuum and in the freezer. The under vacuum, joined temperatures of freezing, decreases the loss of Alpha-acids and the aroma’s hop. When you buy hop, you can notice that label reports a good information about the level of alpha-acids: if Alpha-acids are not present on the label or it is characterized by one interval, it would be better to buy hop from another supplier.
The content of Alpha-acids is real important element during the process of production of a good beer, is the main point to start the perfect receipt which can satisfy hopes about bitter flavor. The bitter flavor of the beer is measured by the International Bitterness Units (IBU): this system measures iso alpha-acids concentration in parts per million in finished beer. Specifically, an IBU unit is equal to 1 milligram of iso-alpha acids per liter of beer.
Flavor and Aroma of Hop
Hops not only give bitter flavor to the beer, but also other flavors and aromas. The brewer can control aroma, density, flavor and aroma of the beer given by hop. Main hops are chosen between low level of alpha-acids or “nobles” hops. For production, usually occurs a specific time of boiling in the must (short period) and infusion of hop in the beer during maturation (this process is called Dry hopping).
The variety of hops chosen will have a strong impact on the flavor of the beer produced. Generally, the hops added in the last 30 minutes of boiling are chosen between different types related to aromas. Typical examples are varieties such as: Hallertau, Tettnanger, Saaz, Goldings, Fuggle, Cascade and Willamette. Although some of these hops have been selected by brewers for "flavor" because they produce pleasant flavors and aromas in beer; they also share some common elements.
The best and safety way to choose the perfect hop for a beer is to verify style tradition which is producing; some styles have really important traditions, for example the use of Saaz in Bohemian (Czech) Pilsener and East Kent Goldings in English Pale Ale. In these cases, the use of another variety of hops can produce a beer that, even pleasant, would not be identifiable as an example of the style that was intended to be made. Other styles have less stricted demands. In these cases, almost any flavor hops that come from the style's country of origin can be used. For example dutch Lagers can be produced using Hallertau, Hersbruck, Tettnanger, o Spalt.
The style reviews in the second part of this book cover the hop varieties commonly used for each style. In this way, where it is possible to learn and follow the tradition, choosing the perfect hope would not be so difficult. But when we have to make a new experience, it is not necessary to take in consideration tradition. Once selected the aroma hop for the beer, it’s time to decide the method will be used to add the hop and the quantity.
Brewers have three option to add flavor:
-Boiling: generally for a short period, from the last 30 minutes till 2 minutes of boiling.
-Immersing: in the boiling vat when the boiling is completed
-Dry hopping: The hop is added to the beer during fermentation or maturation.
Each of these techniques will produce a different flavor and aroma in the finished beer. To produce a marked hop aroma, dry hopping or the use of large quantities of hops at the end of boiling are necessary. Generally, batch of beer of 23 liters is made of late addition of hops, with a quantity that can vary from 7 to 30 gr for each addition. The right quantity to use, during the dry hopping, can be higher from 30 to 60 gr for 23 litres. However, each style requires different method to use the hop, and only the experience can guide us to choose the perfect quantity.
YEAST
The most important part of the beer is the yeast. The yeast makes beer. It’s important to know that the yeast you will choose to put in the most, will be determined for the flavor of the beer, such as every element added.
Breweries take care of the yeast as a treasure. Even some small producers have made and developed unique strains of whom they are jealous. Between lots of options, you can buy dry or liquid yeast: Yeast for beers like Ale, Lager, Lambic, Weizen, and for wine, champagne and mead.
The only disavantage is that it’s rare to use the right quantity of yeast needed to fermentation of domestic production of 23 litres, but even for a commercial production of 10 hl. In the kit of hops there are contenitors of 7 gr of yeast, and this dose is not sufficient for fermentation of about 23 litres, but it is necessary to use almost twice the dose. It could be necessary to substitute contenitors of 7 gr with contenitors of 11,5 gr, the right dose for style.
Yeast converts sugar to alcohol, carbon dioxide and other compounds that influence the taste of fermented foods and beverages. But what kind of yeast do we need? It depends by using specific strain which give the best flavor to your beer.. let’s see!
Characteristics and strains of yeast
Types of yeast: Yeasts are typically divided into three categories: Ale, Lager and Weizen.
Flavor: Yeast strains, even if they are of the same type, they produce different flavor. According to the type of yeast used, the beer can result malted, hoped, fruity, mineral, sweet, dry, clean, with sulphurous and woody taste.
Attenuation: it is the element to measure the quantity of yeast ferment sugars of the must. For all mixture of sugar of the most, each strain will has a specific level of fermentation. It is possible to have a low or high attenuation. Even if there are specific values in percentage, it’s sufficient to know this characteristic in general in terms of low, medium and high attenuation.
Flocculation: is the aggregation of yeast into clumps of yeast towards the end of fermentation. Since lumps of great dimension are deposited on the bottom of the fermenter more quickly than every single cells of yeast, the level of flocculation determines the speed with which the beer will be clearer. Yeast at high flocculation settles quickly and create a clearer product.
If you are thinking to ferment at home, at medium temperature, it would be better to know if the yeast which you want to use works better at 17 °C.
- Ale Yeast
Ale Yeasts are the most common yeasts used by brewers. They ferment at high temperatures, higher than Lager yeasts. They are in the superior part of the fermenter, infact they are called “Yeasts at high fermentation”. Thanks to the ancient heritage of Ale yeast production, nowadays there is wide variety of strains.
- Lager Yeast
Lager beers were born from dutch brewer tradition. Lager yeast works more slowy and produce fewer esters and fusel alchol at cooler fermentation temperatures, usually from 7°C up to 13 °C. Differently from Ale yeasts, Lager yeasts ferment sugar that Ale yeasts cannot ferment and often produce a cleaner and refreshing quality beer.
- Weizen Yeast
These yeasts give important phenolic and ester notes, flavors most common are banana and clove. According to the strain choosen, the temperature of fermentation and composition of the most, it’s possible to have a mixutre of these two flavors, creating a balance between them. Actually, these type of yeasts do not have a good floculation, infact they lying in the product creating an opac effect. The attuation is medium.
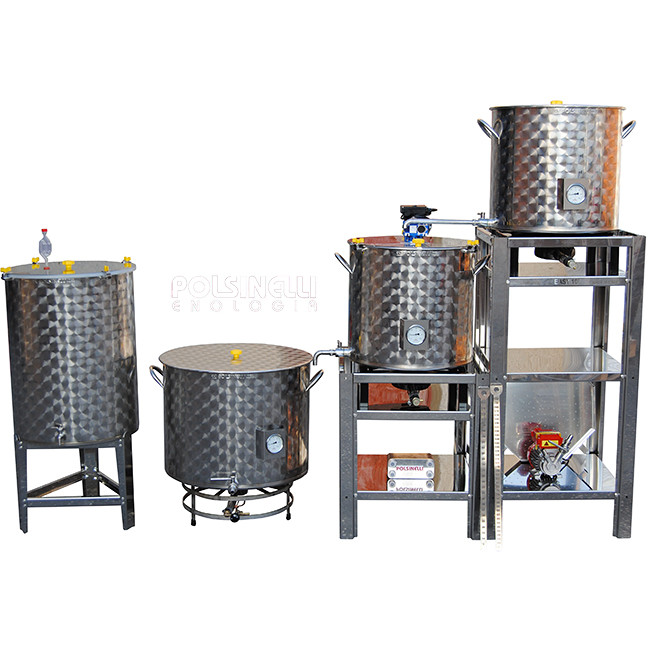
EQUIPMENT
The ideal technique to produce beer is “all grain” technique. With all grain technique, extracts are not used, but barley malts and hops are used. Beer has another flavor, density and aroma.
It is important to check our equipment and add:
- A grain mill: the perfect mill could be barley mill, but if you are an expert in this field you could modify the classic machine for pasta, through the knurling of roller.
- You have to use two or three pots: one for boiling sparge water, one for mashing and one for boiling. The capacity varies according to litres you want to obtain. If you don’t want to spend much money, two pots can be fine as well.
- A good system of filtering: Halo filter which replace the bazooka (because the bazooka is clogged for weight of grains). The falsebottom (filter for grains), it’s the filter used to support the threshers during filtration; basket for threshers is useful for people who won’t to buy the third pot.
- A little container of Iodine tincture (you can buy also in pharmacy): it serves to check the conversion of sugars. This tincture, in touch with amides, turns black while with sugars turns red! This control can be made after the saccharification.
- A must cooling system: The chapest is the "stainless steel coil" made of stainless steel. Thanks to this system, cool water can passed and in this way the must cools down. The heat exchanger instead, is the system that made possible to cool water in shorter time, obtaining faster heat exchange.
- The fermenter: we recommend not to buy plastic fermenters of 23 litres, because the plastic is easily scratched and bacteria can settle. The ideal fermenter with smooth walls with vent on the lid and equipped with a bubbler and tap on the bottom. It is important that it is airtight to prevent the beer from oxidizing or becoming infected.
- Flysparge: it is a good accessory which contributes to distribute the water evenly over the threshers.
Classic Equipment “at waterfall” easy series: This type of system makes it possible not to use electric pumps during sparge, because hot water at 78°C will be produced at the top of the pot, which,at the end of mashing, (central pot) will be poured onto the threshers with the help of the Fly Sparge. During the sparge, the must will be poured on the bottom of the pot, where hops will be added during the boiling.
MASH
Mash is the technique to disassemble some protein present in the malt. It also serves to produce sugars, maltose and dextrose. Mashing in different temperatures, we can obtain different results, for example:
-Between 50° and 52° C (process of PROTEASI) it is possible to disassembled protein, and this serves to make beer cleaner and steady and to create a good foam: usually, this step is used in all grain for Pilsner and its duration is from 15 up to 30 minutes. Some brewers, in the last few years, don’t make this step, because lots of Pilsner malts are modified or don’t make the break necessary to the process.
-Between 60° and 65° C (process of BETA-AMILASI) it is possible to obtain more quantity of maltose and more alcohol compared to elevate temperatures; time of mashing for modern malts wanders between 30 and 60 minutes. Dry, drinkable and very attenuated beers are produced.
-Between 66° and 67° there’s a compromise between two enzymes, step applied to IPA and APA. It gives a medium and balance full bodied beer.
-Between 68° and 70° C (process of ALPHA-MILASI) is produced more dextrose, which in concrete results in a greater body in beer; the pause can vary from 30 to 60 minutes. Then we will get full-bodied beers.
-At 78°C: MASH OUT process: it would be better to do always this step, even if is not specified in the receipt; this step serves to finish the process of mashing and it usually lasts 15 minutes.
Among steps, when it is necessary that the temperature increases, it is correct to make this gradually (it would be ideal 1 degree per minute, excepted when we have to reach the mash out phase, in this case it is necessary a quickly increase of temperature to streamline the must and block enzymes), mixing, and preventing to turn up the heat. The beer doesn’t need sharp rises in temperature and malt in grains can stuck to the bottom of the pot.
SPARGE OR SPARGING
Sparge or filtering is the process that give us the possibility to filter the must and then wash the threshers.
First of all we have to heat a specific quantity of water at 78 ° C (quantity that can be poured on the threshers). Usually, it occurs 3 Lt/kg, so for 5 kg of grains will be used 15 liters of water in the sparging phase: this is a starting dose, that everyone, with some experience, will adapt to the own equipment. After this step (78°C mash-out), let stand the threshers for about 10 minutes, to make it settled. Ended 10 minutes, take from the tap the must (using a carafe): The first liquid obtained will be dirty and turbid and for this reason we will pour it on top of the threshers and continue the operation until we obtain a clean liquid. When we obtained a clean must, we can collect the liquid and put it in the pot that subsequently we put on boiling. In this phase it would be a good thing to have the equipment of three pots, because if we would have only two pots we will have to transfer the must in container, clean the pot of mashing and repour the must in the pot for boiling.
Step by step, threshers will begin to uncover and when they are covered by 1 cm of water, with the aid of skimmer, we have to add warm water gradually until the pre boiling density is not reached yet. If it is not possible to calculate it, then we use all water. Experience will let we know the efficiency of our equipment.
Bring the must obtained to boiling and add the hops. Sparging water mustn’t be poured on unique point, but on all surface. It cannot overcome 80°C, because too hot water can cause extraction of tannins, that would make our beer astringent. If we want, we can add about twenty drops of lactic acid to the sparging water; in this way the pH of the water will be the same as the must.
BOIL
The hopping of the must is necessary to bitter the beer and make it more conservable at the same time, infact in brewing production, the hop is known for its properties of natural preservative.
Generally, in the receipt there are some different steps of hopping, from the simple bitterness of beer (that requires unique dose of hop at 60 minutes) to three phases of hopping when doses of it are insert in different steps. Time of boiling is calculated from the end of it, so hopes have to be insert in different time, but in anyway they should not be removed until the end of boiling. The hop can be put into the must directly in the pot and filtered at the bottom of the boil, or it can be inserted into the special socks so as not to have to filter it.
Those who use the stainless steel coil inserted inside the must, have to remember to put it 10-15 minutes before the end of boiling, so that it is sanitized by the boiling must. The hop is usually left inside the boiling pot until cooling is completed.
For those who use hop pellets, a good solution is to use the “whirlpool technique”: in this way both hops and coagulated proteins will remain in the center of the pot. The same technique can also be used by those who use the socks for hops, after having removed them and before transferring them to the fermenter: in this way we have the separation of the must from the coagulated proteins.
The whirlpool is practiced in breweries and consists in spinning the must like a whirlpool this means that all the dirt remains in the center of the pot. Just turn the must with a large ladle until we see a nice whirlwind in the pot and then remove ladle, wait about 10 minutes and take the must from the sides of the pot.
The must has to be released slowly and when the level drops, you will see that proteins and any hops remain in the center. Those who use the heat exchanger, can carry out this operation while hot, while those who use the stainless steel coil. You must carry out this operation after cooling and after having removed the stainless steel coil.
At the end, we can inoculate the yeast suitable for our beer and let it ferment until the fermentation is over.
INOCULATION OF YEAST
When boiling is finished, we have to cool as quick as possibile, with “stainless steel coil”, measure the density with the densimeter (annotate this element because it will be the OG, the original density of the must. Once we have reached 25 °C, move the must to the fermenter, oxygenating in the best way possible. It will be the only time when the beer is oxigenated; the oxygen is indispensable to activate the yeast.
One of the most important thing is to rehydrate dry yeast at least for 30 minutes before inoculation. To do this operation is necessary to pour in a sanitized glass, some of the sterile must at the start of boiling or sterile water, bringing it to 30 ° C and then pour in the yeast, wait 15 minutes and mix lightly. As time passed, a cream will be formed and it will start to swell.
During the fermentation funds are generated, mainly consisting of protein and yeast residues which are deposited on the bottom of the fermenter. During the activity of the yeasts, some particles remain in suspension of the must which, even if they are not seen, will settle on the bottom of our bottles during maturation. With the technique of fermentation structured on two phases, we can get a cleaner beer because these residues will be reduced considerably. But it is important to make decanting in the correct way.
Once the must is ready, we have to put the must on fermentation, thanks to the fermenter and assemble it with yeasts. As time passes, it is possible to notice that all signs of fermentation, as the formation of the foam on the must, the deposition of residues on the bottom of the fermenter. We will let the days pass and when the densimeter indicates that the density has dropped for about a quarter of the initial one, transfer the beer to another fermenter, cleaned and sanitized, without add something more. Be attention to not transfer more bottoms. At this time, the fermentation is nearly finished and yeast residues they will be deposited on the bottom of the fermenter: we let a few days pass, usually a week.
After the indicated time has elapsed, we transfer our beer back to a perfectly sanitized fermenter or container and then we proceed immediately to the bottling (never bottling before 15 days), putting the sugar with the measuring cup, bottle by bottle, or dissolving the sugar (usually 5 - 6 gr/liter) in a little boiling water and, once it is melted and cooled, we lightly mix it with the beer to be bottled. In this way you can be sure that your beers will certainly have less bottoms in the bottle and no hint of yeast.
PRIMING
Natural carbonation is obtained by adding fermentable sugars at the time of bottling. Alternatively, forced carbonation, CO2 can be added to a beer contained in a watertight container (Keg). The amount of C02 (the gas that is generated by the yeast in the "digestion" of fermentable sugars) is measured in volumes. To understand: a liter of beer contains “x” liters of carbon dioxide. The quantity of gas capable of "dissolving" in the liquid depends on: the pressure of the container (higher is the pressure, more gas there will be and over time, will be able to be absorbed by the liquid) and the temperature (lower is the temperature, more gas will be soluble). The general rule suggests a quantity of 6/7 gr per liter, but because each type of beer requires its own hops and its own blend of malts, so the different types of beer were originally born with different levels of carbonation. To reach the right level of carbonation, we will need to know how much CO2 is dissolved in our beer before bottling. Because the pressure, in our case of fermentation at atmospheric pressure, DOES NOT AFFECT, the only variable is the temperature, at which the fermentation took place.
CO2 SOLUBILITY
Adding the right amount of sugar, depends on the fact that 4 gr liter of fermentable sugars (cane or beetroot) produce exactly 1 volume of CO2.
To make things more difficult, in high-density and aging beers (Barley Wines, Belgian beers, etc.) the yeast takes months to eliminate complex molecules (dextrins) and their subsequent fermentation: this process can increase the final carbonation even by a volume.
PROBLEMS DURING FERMENTATION
The first problem we often found during the fermentation is the airlock that doesn’t work as well!
It happens because most of the time, it is not airtight. So, you have to open the cover and see if the foam is formed on the surface.
The foam indicates that the fermentation is active, so close the cover and be calm. If the foam is not present on the must after 24 hours, means that there was a wrong step during the process of doing yeast, so reinoculate fresh yeast by rehydrating it.
Other cause will be the too low temperature of the fermenter. Ale strains do not work below 16 °C, so put the fermenter in an ideal place (20 ° C). If the fermentation starts and suddenly stops, there could be lots of causes. Making too many steps, you create sugars difficult for the yeast to digest and therefore, once the simple ones are consumed, the complexes that the yeast does not digest remain. Another cause could be the yeast that was inoculated in a lower quantity and it was unable to complete the fermentation.
PROBLEMS DURING BOTTLING
When we open the beer and it comes out vigorously, there’s an excess of carbonation, caused by:
- Wrong calculation of sugar: larger amount of sugar will increase the pression, more than the normal level, and bottles will explode. You cannot drink the beer because it is too frizzy.
- Fermentation not concluded: Don’t rush for bottling! Firstly, yeasts work vigorously and then stop their activity to restart to work. Bottling only when you can see the FG (Final gravity) steady for some days.
- Wild yeasts: These types of yeasts are everywhere! Making beer, the perfect cleaning and the sanitization are indispensable. Lot of time will be spent for cleaning and doing sanitization.
SANITIZATION
The sanitization is one of the most important things for doing beer. Without sanitization, the must and the beer risk to be infected because of bacteria and wild yeasts, that bring bad flavors and aromas.
The must is an excellent source of nutrient, useful to the life of living beings, not only to yeasts. Thanks to this opportunity, every organism in the must starts to grow and produce metabolic byproducts which give flavors and aromas normally associated to the beer. For this reason, it’s too important to eliminate other principal source of possible contamination.
It’s not possible (and it’s not necessary at the same time) to eliminate each bacteria or cells of yeasts that can be in contact with the product.
Bacteria and wild yeasts are everywhere: in the air, on the crockery, on the floor, on dogs and cats, also on our body and on all equipment not cleaned and not sanitized. Following some rules to clean and sanitize your equipment, it could be possible to eliminate principal causes of contamination, and the beer will has no flavors, aromas produced bacteria by unwanted organisms.
Bleach is an excellent sanitizer if diluted, but it corrodes stainless steel over time. Peracetic acid is a good way for stainless steel equipment, first of all the fermenter; it can be diluted with 3 ml of acid in 1 liter of water, without rinse. For the most stubborn dirt, Soda is very useful, it must be rinsed well.
